Dagorhir
Blue Sword Tutorial
101
Iohn deMar
Materials
First off, youre going to need a core. The core is what makes a sword; everything about it depends on it. Now, there are many different cores you can use in Dagorhir and they range all the way from PVC pipe, to carbon fiber. Each core material has its own advantages and disadvantages, making no core better than any other. For this project, however, a good core material for a straight-bladed blue sword is fiberglass. Fiberglass is a wonderful substance and has many uses in our modern world that we depend on. In Dagorhir, fiberglass serves as a lightweight, strong, and relatively stiff material ideally suited for weapon-crafting. The problem arises when trying to find a fiberglass core that is suitable. What youre looking for is a solid rod of fiberglass either ⅜ or ½ in diameter. The ⅜ diameter rods are commonly sold as fence posts in tractors supply stores. ½ rods are a bit more tricky to find, but can be ordered online from warehouse distributors easily enough.
Aside from a core, the next most important part is the foam, an essential item to making a safe weapon. Without foam, youll have nothing more than a plastic rod (which is a poor substitute for a foam sword). There are many thousands of foams used for thousands of different applications, but good sword-quality foam is closed-cell foam. Closed-cell foam is commonly used as padding in sports equipment, camping gear, and childrens toys. But not just any closed-cell foam will suffice. Because Dagorhir is a full-contact sport, great care needs to be taken in choosing a foam. Polyethelene, as used by Dagorhir, is more commonly referred to as blue Walmart foam, and the more popular ethylene-vinyl acetate (or EVA). While the infamous Walmart blue foam is most used, EVA is by far the superior product. There are many other foams used, but for simplicitys sake these will be the only two mentioned hereafter. The choice between the two foams is not one to be taken lightly. Although both foams will get the job done, if youre looking for quality in your weapons (and happen to have some extra cash) EVA is your best bet. You can order EVA from several online warehouses. If youre only looking for a place to start, I highly recommend the Walmart blue foam for the best deal.
The tools youll need to assemble the sword are as follows.
-Adhesive: DAP Weldwood Original Contact Cement is by far the most versatile and effective adhesive available. You can find it in most hardware stores. Just be careful when applying it. It can be very messy, and the fumes are very toxic. Be sure to read the safety instructions before making your sword.
-Tape: Duct tape can make or break your weapon. Use it sparingly. It adds a lot of weight to weapons, and when put over a striking surface can cause injury. It can also cut into foam over time. On the upside, it has a few uses that no other tape can outperform. Masking tape can be handy for holding together foam until the glue dries. It can then easily be peeled off leaving the foam intact. Athletic tape is most commonly used on handgrips and haft covering, but it is only optional.
-Ruler: A straight-edge ruler such as a yardstick is invaluable to making accurate measurements and cuts. A cloth tape measure can also be useful for measuring circumferences.
-Knife: Youll need a sharp knife to cut foam. A box knife is a good choice; when the blade dulls you can insert a new one. Exacto® blades are an excellent alternative.
-Marker: A permanent marker is useful for making clear markings on the core and foam.
-Hacksaw: Youll need a hacksaw to cut the core to the desired length. Be sure to wear gloves and a facemask when cutting fiberglass. The fibers can get into eyes, skin, and lungs.
Step 1.
Okay, so now that you have everything together lets start at the bottom and work our way up. The core needs to be cut to length. But what is a good length you ask? A good rule of thumb is to mark off the core into three sections. Leave 2 for a pommel. Any less than that and your pommel will become wobbly from the stress your hand puts on it and eventually rip right off. For a good area for a handhold leave 5. This will leave you plenty of room to properly hold your sword. As for a good length for a blade, this will be different for everyone. One method is to hold a yardstick and measure the distance from the ground to your hand. 24 (two feet) is a commonly used length.

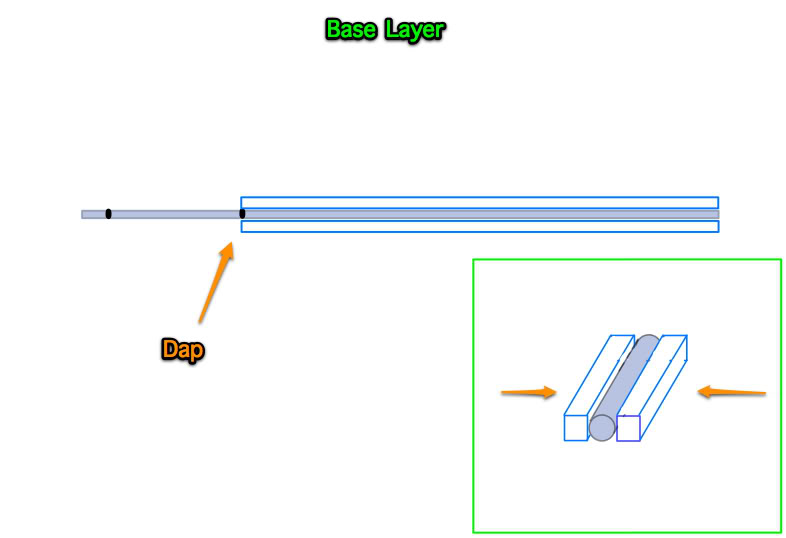
Step 2.
You now have your core marked appropriately. Some fiberglass cores have a gloss coating. This coating will prevent the DAP from adhering properly. If you choose to remove this coating, carefully (with mask and gloves) sand off the coating until the core no longer has a glossy sheen. Your next objective is to cut the foam. Start by making the base layer; cut two pieces of foam 24 x ⅜ x ⅜ (the typical thickness of Walmart blue foam is ⅜ which should be the same as the diameter of your core). Make sure to always measure and mark before you cut, and when you cut use a straight edge as a guide. The extra work will pay off in the end; cleaner cuts make for prettier weapons. Carefully apply DAP to both surfaces (the foam and the core). The most common way to apply DAP is by using a scrap piece of foam as a brush. Spread the DAP thin enough so there are no globs, but even enough so you cover the entire area. This is because the liquid component of DAP is not an adhesive, but a lubricant to keep the adhesive component from sticking to the inside of the can. When this liquid dries, it leaves behind the adhesive (which is very strong). Wait until the DAP looses its sheen before applying (this drying time can take anywhere from 3-15 minutes). Apply one strip at a time, being careful to lay them on straight.
Step 3.
Now that your core is beginning to resemble something like a foam sword, continue construction by the means of the box method. The box method is a construction method commonly used in Dagorhir. It relies on creating a box of foam around a cylindrical core (PVC or fiberglass). Cut two strips of foam 24 x 1 ⅛. They will be placed on the sides to form the box. Dap both surfaces, wait for the Dap to dry, and apply carefully. A lot depends on the uniformity of the box, as it is the foundation of the sword blade.

Step 4.
Okay, so now you have this box-thing with a ⅜ diameter fiberglass rod in the center. Hopefully you followed the Dap-ing procedures correctly and your foam strips are adhered securely and uniformly to the core. It is of vital importance that the core foam layer be adhered strongly to the core because over time, use will wear down the blade and the foam may tear away from the core. On to the next step, however. Right now, take a strip of duct tape and place it over the end of the box. Take another strip and place it across the first. This will discourage the tip from poking through the following applications of foam. Cut a strip of foam 54 x 1 ⅛. This will wrap over the previous layer of foam to form a more rounded tip to resist wear and tear. Dap both surfaces, and apply carefully. Trim off the excess foam at the base of the blade.

Step 5.
The next step is really quite simple. Cut another strip of foam 58 x 1 ⅛. Dap this strip and the last application of foam. Wait for the Dap to loose its sheen (make sure the Dap is dry). Apply the second foam wrap over the first one. Cut off any excess foam at the base of the blade.

Step 5.2.
This step is optional, but may increase the lifespan of your sword. Simply take a strip of duct tape and lay it on the flats of the blade near the tip. This will help to reduce stress on the tip of your sword.

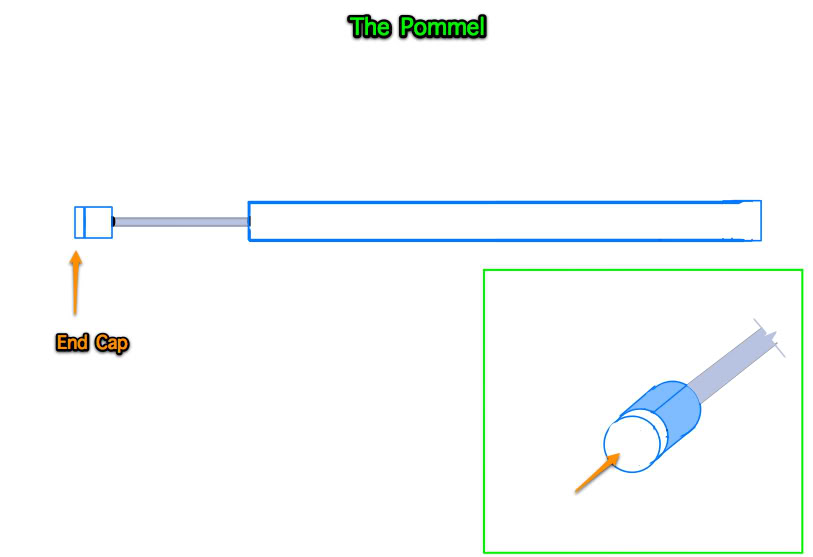
Step 6.
The last part of your sword is your pommel. In all honesty, pommels can be more important than some people would like to believe. Thankfully, not a lot of effort needs to go into making a safe pommel. Cut a 2 x 5 rectangle of foam, and bevel the ends at a 45˚ angle as shown. The reason behind this is to make for a cleaner application against the fiberglass rod. Dap and wrap around the end of the core.


Step 6.2.
Cut out a foam disk (cans with the top cut off from the sides - so the tops of the can are sharp - work well for this) the diameter of the cylinder. This should be about 1 ⅛. Dap and cap the end of the cylinder.
Step 6.3.
Cut out a foam rectangle 1 x 7. Bevel the edges just like before, Dap, wait for the Dap to dry, and apply over the cylinder flush with the end.

Step 6.4.
Cut out a second foam disc the diameter of the new cylinder. This should be about 1 ⅞. Dap both surfaces, wait for the Dap to dry, and they place on the end of the pommel. Now you should have a nice bevelled pommel that fit to your hand very nicely. Not to mention a bevelled pommel will reduce the chance of your pommel ripping off.

Step 7.
Make a cloth cover for your blade. Duck cloth, canvas, or cotton stretch twill is recommended for longevity. Without a cover, your sword will break down ten times as fast. Remember to use heavy duty thread when stitching too. The wear and tear on a weapon means the stitching will be the first to go. By using stronger thread, your swords life will be extended.

Now, go hit something.


